Migration from Swift to SwiftUI
SwiftUI is a new framework introduced by Apple in 2019 for building user interfaces on iOS, macOS, watchOS, and tvOS. This framework provides a new way of building interfaces that is more declarative and efficient than the traditional approach using UIKit. With the release of iOS 14, developers are encouraged to adopt SwiftUI for their new projects and also move their existing projects to SwiftUI.
In this article, we will discuss the steps to move an existing Swift project to SwiftUI. The process can be broken down into three main steps:
- Familiarize yourself with SwiftUI: Before you begin the migration process, it is important to familiarize yourself with the basics of SwiftUI. This includes learning about the new layout system, components, and the new way of handling events and data. Apple provides a comprehensive set of resources to help you learn SwiftUI, including tutorials and documentation.
- Identify SwiftUI Equivalent of UIKit Components: As you start migrating your project, you will need to identify the SwiftUI equivalent of UIKit components that you are using in your project. For example, the UITableView in UIKit is replaced by List in SwiftUI, and UIView is replaced by VStack or HStack.
- Refactor Your Code: Once you have identified the equivalent SwiftUI components, you can start refactoring your code. You will need to replace UIKit components with their SwiftUI equivalents and adjust your code accordingly. This step can be a bit time-consuming, but it is important to take the time to do it properly to ensure that your app works as expected.
It’s important to note that SwiftUI is not a direct replacement for UIKit, there are still some limitations and missing features. But, SwiftUI is constantly updated by Apple and the community, so it’s worth investing time in it.
In conclusion, moving an existing Swift project to SwiftUI is a process that requires careful planning, but the benefits are worth it. With SwiftUI, you can build interfaces that are more efficient, responsive, and easier to maintain. With iOS 14, SwiftUI is becoming more powerful, and it’s a good time to start learning and adopting it in your projects.
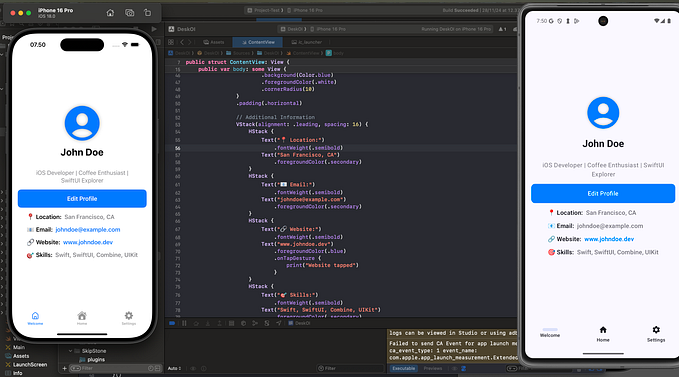
Here is a simple example of how you can refactor a basic UIViewController in Swift to a View in SwiftUI:
import UIKit

class ViewController: UIViewController {

    let label = UILabel()

    override func viewDidLoad() {
        super.viewDidLoad()

        label.text = "Hello, World!"
        label.textAlignment = .center
        label.frame = CGRect(x: 0, y: 0, width: 200, height: 200)
        label.center = view.center

        view.addSubview(label)
    }
}
import SwiftUI
struct ContentView: View {
var body: some View {
Text("Hello, SwiftUI!")
.frame(width: 200, height: 200)
.background(Color.yellow)
.foregroundColor(.black)
.font(.largeTitle)
.multilineTextAlignment(.center)
}
}In SwiftUI, instead of adding subviews to a view hierarchy, you build the hierarchy of views by composing smaller views into larger ones. The body property in the ContentView struct is a View that represents the root view of the hierarchy. The example above creates a text view with a yellow background, black text, large title font, and centered text alignment.
Conclusion
I hope this article has been of help to you. practice, and improve your skills. Make you better developers.
Become a better developer with my templates. Your support by purchasing one of my templates would be greatly appreciated. Thank you.
My Swift UI news app template has been sold on the CodeCanyon website.
https://codecanyon.net/item/news-feed-app-using-swiftui/43068768 😄